Category Archives: Meatless Main Dishes

Black-Eyed Peas

Black-Eyed Peas 101 – The Basics

Black-eyed peas are a delicious legume that is popular in the American South (among other places around the world). If you’re not familiar with them, you’re missing out! Below is a comprehensive article all about black-eyed peas, from what they are to suggested recipe links. If you haven’t tried them before, I urge you to at least give them a try sometime with any recipe that sounds like a “go” for you and your family. I doubt you’ll regret it!

Enjoy!
Judi

Black-Eyed Peas 101 – The Basics

About Black-Eyed Peas
Despite their name, black-eyed peas (Vigna unguiculata) are actually a type of shelling bean in the cowpea family. Their pods can be up to two feet long. Black-eyed peas are native to Asia and Africa and have been cultivated since about 3,000 BC. According to early records, black-eyed peas were brought to the West Indies by West African slaves, then onward to America. They were originally used as food for livestock, but became a staple in the slaves’ diet. The fields were left untouched by northern soldiers who saw no value in the crops, so they became an important food for the Confederate South in America.

Black-eyed peas are still a staple in Southern (American) foods where they are commonly served with deep leafy vegetables such as collard or turnip greens. In the South, it’s customary to eat black-eyed peas and greens on New Year’s Day for good health and wealth in the New Year.

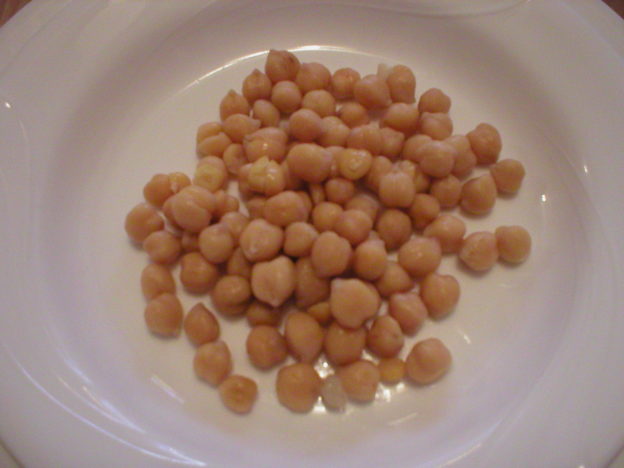
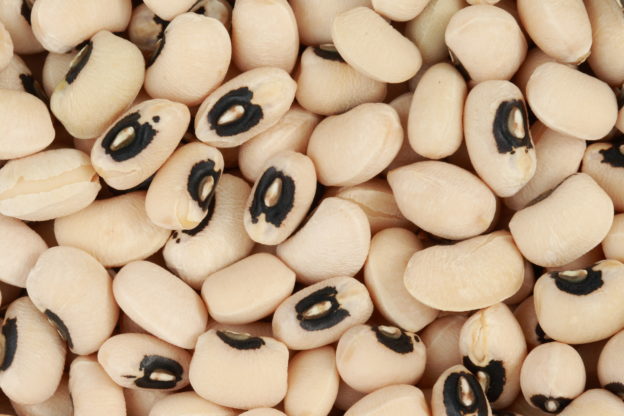
Black-eyed peas have a kidney shape and are white with a black eye in the center. The black “eye” forms where the pea attaches to its pod. They have a creamy texture and a flavor all their own, that can be described as nutty, earthy, and savory.

Nutrition and Health Benefits
As with all legumes, black-eyed peas are a healthful addition to the diet. One cup of cooked black-eyed peas has 160 calories, negligible fat, and 5 grams of protein. That same one cup also has substantial amounts of calcium, iron, magnesium, zinc, copper, manganese, folate, and Vitamins A and K. They are also a very good source of soluble fiber which is known to help lower cholesterol thereby warding off heart disease.

Folate. One cup of cooked black-eyed peas provides more than half of our daily folate needs. This crucial B-vitamin is not only important in preventing anemia, but is also critical for pregnant women in ensuring their offspring are not born with neural tube defects (spinal and brain issues).

Manganese. One cup of cooked black-eyed peas also provides roughly half of our daily needs for manganese. This mineral is a valuable antioxidant that helps to protect cellular structures from damage. It is also used in the formation of cartilage and the metabolism of carbohydrates, proteins, and fats.

Vitamin A (Beta-Carotene). One cup of cooked black-eyed peas provides a substantial amount of Vitamin A by way of its beta-carotene content. This important vitamin is critical for proper eye function and also skin health. It also is utilized in the maintenance of our mucous membranes in the respiratory and gastrointestinal tracts, helping to protect the body from invading pathogens. Vitamin A is also critical in the proper functioning of our immune system protecting us from pathogens that have entered the bloodstream.

All things considered, black-eyed peas are a very healthful food to include in your diet when you can. Their nutrient content can help to lower the risk of diabetes, improve blood pressure, decrease blood lipid levels thereby lowering the risk of heart disease, and reduce inflammation. All from a humble black-eyed pea!

How to Select Fresh Black-Eyed Peas
If you plan to shell the peas yourself, look for pods that appear fresh and tender. Avoid those that look dried out, blemished or moldy.

If you are shopping for fresh peas that have already been shelled, choose ones that look fresh and tender. Avoid those that look dry, wrinkly, or show signs of age and starting to spoil.

How to Store Fresh Black-Eyed Peas
Freshly harvested black-eyed peas are highly perishable and have a short shelf life. Unshelled peas should be kept in a cool, humid place (at 45°F to 50°F) for no more than 3 to 4 days after harvest. They should be shelled and cooked or frozen as soon as possible after being purchased.

Shelled, uncooked peas may be kept in the refrigerator in a covered container or plastic bag for no more than 7 days. Once cooked, black-eye peas should be stored in the refrigerator in a covered container and used within 3 to 5 days.

How to Prepare Fresh Black-Eyed Peas
Rinse the pods to remove any debris. Slim, very young black-eyed peas can be eaten in their pods, like green beans. The more mature peas should be removed from their pods before being cooked. To do that, gently squeeze the pod so it will separate at the seam. If that does not work, you can carefully cut along the seam with a knife. Allow the peas to drop into a bowl or container. Discard the pods. Rinse and drain the peas.

If your fresh peas have already been shelled, place them in a bowl of cold water and sort through them. Remove any damaged peas or those that have an off color. Drain the peas and rinse/drain them again until the water is clear and free of debris. Cook them right away, if possible. If you can’t cook them immediately, place them in a covered container in the refrigerator and cook them as soon as possible.

If the peas are to be cooked and eaten right away, they will need to be boiled in broth or water until tender. This takes anywhere from 30 minutes to 1 hour, depending upon how tender you like them. The cooking liquid may or may not be used in your dish, depending on the recipe and personal preferences.

If the peas are to be frozen, they will need to be blanched first. See the section (below) on “How to Freeze Fresh Black-Eyed Peas” for instructions.

How to Freeze Fresh Black-Eyed Peas
Rinse the pods to remove any debris, then remove the peas from the pods. To do that, gently squeeze the pod so it will separate at the seam. If that does not work, you can carefully cut along the seam with a knife. Allow the peas to drop into a bowl or container. Rinse and drain the peas. Rinse/drain them again until the water is clear. Discard the pods and any immature, over-mature, or damaged peas. Bring a large pot of water to boil and boil the peas for 2 minutes. Immediately transfer the peas to a bowl of ice water and allow them to cool for 2 minutes. Drain well and spread the peas out on a tray and blot dry with a paper towel. Place the tray in the freezer and allow the peas to freeze. Transfer the frozen peas to a freezer bag or container. Label with the date and return the peas to the freezer.

Alternatively, you could place your boiled, cooled and drained peas to a freezer bag, and lay the bag flat in the freezer. It will be helpful to move the bag occasionally as they freeze to avoid having them all frozen into one big lump.

For best quality, use your frozen peas within 6 months. They will be safe to eat beyond that, but the quality may deteriorate.

Fresh vs Dried vs Canned Black-Eyed Peas
Fresh. Fresh black-eyed peas are not commonly found in grocery stores. In areas where they are grown, they may be found at farmers’ markets or roadside stands. Other than that, they would be hard to come by in areas where they are not grown. So, most people don’t have fresh peas as an option.

Dried. Most grocery stores carry dried black-eyed peas year-round. They are a staple pantry item for many people and will keep at room temperature in an airtight container for 2 to 3 years. They are edible beyond that, although their quality may deteriorate. Since they have been shelled and soaking/cooking them is not a difficult process, dried black-eyed peas are a good item to keep in your food supply.

Canned. Canned black-eyed peas are found in most grocery stores. Their flavor and texture are comparable to dried peas that have been fully cooked. Some varieties are already seasoned. They are truly a convenience food in that they are ready to eat simply by opening the can and rinsing them, if desired. Canned black-eyed peas are an excellent option to keep in the pantry, especially in case of emergencies when there is a power outage.

How to Prepare Dried Black-Eyed Peas
Dried black-eyed peas can be prepared the same way you would prepare any dried bean or pea. First rinse and sort through the beans, removing any stones or other debris, and damaged peas. They should be “quick soaked” or “overnight soaked” first before being cooked. This is an important step because it reduces the compounds that can cause gas and bloating in some people when beans/peas are eaten.

Quick Soak Method: After the peas are rinsed and sorted, place them in a large pot of water. Bring everything to a rapid boil, and boil for 2 minutes. Remove the pot from the heat, cover with a lid, and allow the peas to sit in the hot water for 1 hour. Drain the soak water and rinse the peas. Then cook the peas by covering them with cold water in a large pot. Bring to a gentle boil, then lower the heat to simmer with the lid tilted. Allow them to cook until they reach the desired tenderness. This can take anywhere from 40 minutes to 2 hours, depending upon how tender you like them and how fast the water is boiling. See the “Important!” note below.

Overnight Soak Method: After the peas are rinsed and sorted, place them in a large pot of cold water. Cover the pot and let the peas soak overnight or at least 6 to 8 hours. Drain the soak water and rinse the peas. Then cook the peas by covering them with cold water in a large pot. Bring to a gentle boil, then lower the heat to simmer with the lid tilted. Allow them to cook until they reach the desired tenderness. This can take anywhere from 40 minutes to 2 hours, depending upon how tender you like them and how fast the water is boiling. See the “Important!” note below.

Important! When cooking dried peas or beans, do not add salt or any type of acid (such as lemon juice or vinegar) to the water early in the cooking process. This will cause the skins of the peas to toughen and they will not soften up like expected, even with extended cooking time. Save adding salt until they have already started to become tender. Add any acid at the end of cooking time, because adding it early can cause it to turn bitter.

Quick Ideas and Tips for Using Black-Eyed Peas
Here are some tips and ideas for using black-eyed peas…

* When cooking dried black-eyed peas after they have been soaked, do not add salt to the water early in the cooking process. When added early, the salt will cause the outer skin of the peas to toughen, making it hard to get them to soften as they cook. Add salt toward the end of cooking after the peas have already started to soften, or save the salt until the peas are used in a specific dish.

* When cooking dried black-eyed peas after they have been soaked, do not add any acid (such as lemon juice or vinegar) to the cooking water early in the cooking process. The acid will turn bitter when added too early. Wait until the peas are fully cooked, then drizzle them with a little acid of choice for flavoring.

* If you like the convenience of canned peas, but don’t want the additives found in canned foods, try buying dried peas, soaking and cooking them completely (or almost completely), and freezing them. You’ll have whatever amount of peas you need without added salt, etc., ready to go whenever you need them.

* Make a black-eye pea salad with peas, chopped tomatoes, corn, onion, avocado, bell pepper, cilantro and your favorite Italian dressing.

* Finely chop the vegetables (for the salad above), add a little cumin along with the salad dressing and turn it into a salsa.

* Make a black-eyed pea dip by blending black-eye peas with garlic, onions, tomatoes, cilantro, oil, balsamic vinegar, and salt and pepper to taste. Add a little sugar to sweeten the mix just a bit.

* Make a “sloppy Joe” type of mixture by sautéing (in oil or vegetable stock) some onion, garlic, bell pepper and carrots until tender. Stir in cooked black-eyed peas, some cooked grain of choice (i.e. rice, millet, couscous), Cajun seasoning (or a mix of paprika, thyme, oregano, salt, pepper, cayenne, garlic and onion powder), and 2 or 3 tablespoons of tomato paste. Add more vegetable broth for liquid as needed. Serve as-is, on toasted buns, or on a bed of cooked grain.

* Enjoy a traditional Southern (American) dish by serving cooked black-eyed peas on a bed of cooked grain (rice), with a side of deep leafy greens, and a slice of cornbread.

Herbs/Spices That Go Well with Black-Eyed Peas
Allspice, basil, bay leaf, cilantro, coriander, cumin, dill, garlic, ginger, marjoram, oregano, parsley, pepper, sage, salt, thyme

Foods That Go Well with Black-Eyed Peas
Proteins, Legumes, Nuts, and Seeds: Bacon, beans (in general), black beans, chicken, eggs, fish, ham, kidney beans, pork, poultry, and tahini

Vegetables: Arugula, bell peppers, cabbage, carrots, celery, chard (Swiss), chiles, greens (bitter; i.e. collards, mustard, turnip greens), mushrooms, onions, potatoes, scallions, shallots, spinach, tomatoes

Fruits: Lemon, olives, tamarind

Grains and Grain Products: Barley, corn, corn bread, rice

Dairy and Non-Dairy: Butter, cheese (i.e. feta), coconut butter, coconut milk, cream, yogurt

Other Foods: Agave nectar, barbecue sauce, capers, oil (i.e. olive, safflower, sunflower), tamari, vinegar (i.e. apple cider, balsamic)

Black-eyed peas have been used in the following cuisines and dishes…
African cuisine, burritos, Cajun cuisine, Caribbean cuisine, casseroles, chili (vegetarian), Creole cuisine, dips, gumbo, hummus, Indian cuisine, salads (i.e. bean, green, Hoppin’ John, tomato), soul food, soups, Southern (US) cuisine, stews, succotash, “Texas caviar”

Suggested Flavor Combos Using Black-Eyed Peas
Combine black-eyed peas with any of the following combinations…

Bell peppers + celery + onions
Brown rice + onions
Coconut milk + sticky rice
Corn + dill
Feta cheese + tomatoes
Garlic + greens
Onions + tomatoes
Pumpkin + rice

Recipe Links
Hoppin’ John https://thepioneerwoman.com/cooking/hoppin-john/

Avocado Black-Eyed Pea Salad https://www.callmepmc.com/avocado-black-eyed-pea-salad/

Avocado Black-Eyed Pea Salsa https://www.allrecipes.com/recipe/213030/avocado-and-black-eyed-pea-salsa/

Black-Eyed Pea Salad with Avocado and Jalapeno https://www.tasteofhome.com/recipes/black-eyed-pea-salad-with-avocado-and-jalapeno/

Southwestern Black-Eyed Pea Salad https://www.shelikesfood.com/southwestern-black-eyed-pea-salad/

Avocado and Black-Eyed Pea Salsa https://www.epicurious.com/recipes/member/views/avocado-and-black-eyed-pea-salsa-53032281

Cowboy Caviar https://www.culinaryhill.com/cowboy-caviar-recipe/#wprm-recipe-container-26521

Black-Eyed Pea Casserole with Cornbread Crust https://www.rachaelhartleynutrition.com/blog/2015/12/black-eyed-pea-and-greens-casserole-with-cornbread-crust

Black-Eyed Pea Hummus https://www.gritsandpinecones.com/black-eyed-pea-hummus/#wprm-recipe-container-19643

Lucky and Spicy Black-Eyed Pea Salad Recipe http://www.vietworldkitchen.com/blog/2010/12/spicy-black-eyed-pea-salad-recipe.html

Zannie’s Black-Eyed Pea Dip https://thepioneerwoman.com/cooking/zannies-black-eyed-pea-dip/

Southern Black-Eyed Peas (Vegan) https://healthiersteps.com/recipe/southern-black-eyed-peas-vegan/

Vegan Black-Eyed Peas https://www.thespruceeats.com/vegetarian-black-eyed-peas-1001609

Creole Black-Eyed Peas https://blog.fatfreevegan.com/2008/01/creole-black-eyed-peas.html

Black-Eyed Peas with a Healthy Twist https://www.justapinch.com/recipes/side/other-side-dish/black-eyed-peas-with-a-healthy-twist.html

Black-Eyed Peas with Bacon and Pork https://www.foodnetwork.com/recipes/patrick-and-gina-neely/black-eyed-peas-with-bacon-and-pork-recipe-1920605

Black-Eyed Pea Salad https://www.foodnetwork.com/recipes/patrick-and-gina-neely/black-eyed-pea-salad-recipe-1910721

Resources
http://www.foodreference.com/html/fblackeyedpea.html

https://www.specialtyproduce.com/produce/Black_Eye_Peas_6584.php

https://foodcombo.com/find-recipes-by-ingredients/black-eyed-peas

https://www.stilltasty.com/fooditems/index/16567

https://www.latimes.com/food/la-xpm-2012-sep-15-la-fo-rosh-hashanah-rec1-20120915-story.html

https://healthyeating.sfgate.com/health-benefits-blackeyed-peas-4253.html

https://www.livestrong.com/article/414892-health-benefits-of-black-eyed-peas/

https://cookforgood.com/how-to-shell-fresh-black-eyed-peas-and-field-peas/

https://www.aces.edu/blog/topics/food-safety/fresh-from-the-farm-alabama-recipes-fresh-black-eyed-peas-and-other-southern-peas-best-vinaigrette-for-pea-salad/

Cooperative Extension Service, The University of Georgia. (1993) So Easy to Preserve. 3rd edition. Athens, GA: Cooperative Extension Service.

Page, Karen. (2014) The Vegetarian Flavor Bible. New York, NY: Little, Brown and Company.

About Judi
Julia W. Klee (Judi) began her journey enjoying “all things food” in elementary school when she started preparing meals for her family. That love of food blossomed into a quest to learn more and more about health and wellness as related to nutrition. She went on to earn a BS Degree in Food and Nutrition, then an MS Degree in Nutrition. She has taught nutrition and related courses at the college level to pre-nursing and exercise science students. Her hunger to learn didn’t stop upon graduation from college. She continues to research on a regular basis about nutrition as it relates to health. Her hope is to help as many people as possible to enjoy foods that promote health and wellness.

Chickpeas

Chickpeas 101 – The Basics

If you’re wondering about chickpeas, from what they are to how to use them, you’re in the right place! Below is a comprehensive article all about chickpeas!

Enjoy!
Judi

Chickpeas 101 – The Basics

About Chickpeas
Chickpeas are members of the Fabaceae plant family. They originated in the Middle East, where they are still widely used. Researchers have evidence that chickpeas were consumed as far as 7,000 years ago, with evidence that they were cultivated as far back as 3,000 BC. From the Middle East, chickpeas slowly made their way around the world. Today, the main commercial producers of chickpeas are India, Pakistan, Turkey, Ethiopia, and Mexico.

Chickpeas have developed many names around the world, including garbanzo beans, garbanzos, grams, Bengal grams, Egyptian peas, and besan (when ground into flour). There are different varieties of chickpeas commonly grown, with some being green, black, brown, red, or the very familiar tan color. “Kabuli” are large and beige with a thin skin. This is the type commonly found in American grocery stores. “Desi” chickpeas are small and dark with yellow interiors. The Desi type chickpeas are about half the size of the Kabuli chickpea that Americans are familiar with. This is the most popular type of chickpea worldwide. They have a thicker seed coat than the Kabuli type. “Green” chickpeas are younger and have a sweeter flavor than the other types. They are similar to green peas.

Chickpeas are the seeds of the plant, grown for their highly nutritious qualities, including an abundance of fiber, protein and other nutrients. They have a mild, nutty flavor and buttery texture. Chickpeas are naturally gluten-free.

Nutrition Tidbits and Health Benefits
Chickpeas contain a lot of antioxidants, protein, fiber and other nutrients too. Their antioxidants not only combat free-radicals in the body, but also appear to have anti-inflammatory effects. This alone makes them powerful foods to include in the diet.

Chickpeas also supply a lot of protein, with 1 cup of cooked chickpeas providing over 14 grams. That same cup of cooked chickpeas also provides over 12 grams of fiber, along with a lot of molybdenum, manganese, folate, copper, phosphorus, iron, zinc, and B-vitamins. One cup of cooked chickpeas has about 270 calories. They have a low glycemic index, so they are digested and absorbed slowly, without a large spike in blood sugar.

Selecting Chickpeas: Dried vs Canned
Dried: Chickpeas are sold dried or canned. Dried chickpeas are usually prepackaged but are sometimes sold in bulk bins. Make sure there is no sign of moisture or insect damage when selecting dried chickpeas. When purchasing from bulk bins, also make sure there is a good turnover of product in the bins so you can be assured they are as fresh as possible.

Canned: Most grocery stores carry canned chickpeas and they are a great staple food to keep in the pantry when time is short. They can simply be used from the can when needed for a salad or hummus, or heated briefly in cooked foods. Many people use the liquid from canned chickpeas (called aquafaba) as an egg white substitute and when making vegan meringues.

The nutritional value of canned chickpeas is good when compared to some other canned foods. The value of most nutrients is lowered by about 15% in canned chickpeas, with the exception of folate, which is lowered by 45% when compared to the folate level in dried chickpeas. There is some concern with the BPA content of canned goods. If you are avoiding BPA from canned foods, be sure to look for cans labeled as BPA-free. Also, some canned chickpeas may contain additives like salt and/or calcium chloride (a firming agent). If those additives are concerns for you, then dried chickpeas may be a better option. However, organic canned chickpeas should contain little to no additives with the exception of salt. Some brands may carry salt-free options in BPA-free cans.

Aquafaba
Aquafaba is what many people call the liquid in canned chickpeas. (Note that this does not apply to the liquid in other types of canned beans.) Due to its thick nature, this liquid can be used straight from the can as a substitute for egg whites in cooking. It can also be whipped into meringues and marshmallows.

Mix aquafaba with some cream of tartar and whip as you would egg whites. The fluff will hold together well and lighten quick breads and muffins. According to Bob’s Red Mill, use 1/8 teaspoon of cream of tartar with ½ cup (8 tablespoons) of aquafaba. For more information on how to use aquafaba as an egg replacer, please visit their site at https://www.bobsredmill.com/blog/featured-articles/a-guide-to-aquafaba/

To use aquafaba, it’s helpful to first shake the unopened can of chickpeas. Open and drain the can into a fine mesh strainer over a bowl, separating the canned peas from their liquid. Briefly whisk the liquid to blend the starches that may have settled on the bottom of the can, then measure it as needed for a recipe. Fresh aquafaba can be stored in a covered container in the refrigerator for up to 1 week.

Extra aquafaba can easily be frozen for later. Freeze it in 1 tablespoon increments in an ice cube tray. When frozen, transfer the cubes to a labeled freezer bag. It may easily be thawed in the microwave, if desired. Aquafaba will keep for about 2 months in the freezer.

See also: A Guide To Aquafaba at https://minimalistbaker.com/a-guide-to-aquafaba/

Chickpea Flour
Chickpea flour is available in some grocery stores, and can be purchased online. Most chickpea flour available is made from raw chickpeas. When using this type of flour, be sure it is used in a recipe where it is well-moistened and also cooked in some way. This will make it more digestible. Otherwise, the finished product may be hard to digest and could cause excessive gas. Because it is usually made from raw chickpeas, this type of flour should not be eaten raw.

How to Store Chickpeas
Dried chickpeas should be stored in an airtight container in a cool, dry, dark place. They will keep well for about a year. The longer they are stored, the drier they will become and may take longer to cook. It’s helpful to rotate your supply of dried chickpeas (like all foods), using the “first-in, first-out” method (cook your oldest chickpeas first). Once cooked, chickpeas should be stored in the refrigerator in a covered container and used within four days.

As with most, if not all canned foods, canned chickpeas should have a “best by” date stamped on the can. For best quality, use them before that date. Store cans in a cool, dry place.

How to Prepare Dried Chickpeas
Dried chickpeas should first be sorted and examined so you can remove any stones, debris, or damaged beans. Then they should be rinsed well and drained. Before actual cooking, chickpeas should be soaked which makes them more digestible. There are two methods for soaking chickpeas.

Quick-soak method: Place the sorted and rinsed beans in a large pot with about 2 to 3 parts of water to 1 part of chickpeas. Bring the contents to a boil. Cook, uncovered, for 2 minutes. Remove the pot from the heat, cover, and allow the chickpeas to soak for 2 hours. Then drain and rinse the chickpeas. Add fresh water to the pot and bring it to boil. Lower the heat and simmer until they are tender. The time will vary depending upon how dry the beans were. Drain, then use as planned.

Traditional soaking method: This method involves a longer soaking time, but may actually be preferred because it further reduces compounds in the chickpeas that may cause gas when they are eaten. After the peas are sorted, rinsed and drained, place them in a large pot with at least 3 to 4 parts of water per 1 part of chickpeas. Cover the pot and allow them to soak for at least 6 to 8 hours, up to 12 hours. Drain, then fill the pot with fresh water. Bring them to boil, lower heat and simmer gently until the chickpeas are tender. The time will depend upon how long they soaked and how dry they were initially. Some directions call for cooking up to 2 hours, but I have found that they usually cook faster than that. Drain, then use as planned.

Note! When cooking any type of dried pea or bean, be sure not to add any acid nor salt to the water early on when cooking the pea or bean. Doing so will make the outer shell tough which makes the dried pea or bean hard to cook, and they may not soften like you expect. If you want to salt the water or add an acid (like lemon juice or vinegar), only add it when the peas or beans are almost finished cooking and no sooner.

One cup of dried chickpeas yields about three cups cooked. Cooked chickpeas should be stored in a covered container in the refrigerator and used within four days.

Freezing Chickpeas
Sorted, rinsed and soaked, but uncooked chickpeas may be frozen in covered containers. After soaking, drain them well, then place them in an airtight freezer container. They will keep in the freezer for up to 1 year.

If you want to cook dried chickpeas in advance and have them whenever needed, simply drain your cooked chickpeas and place them in a labeled freezer bag. Flatten the bag, lay them down in the freezer and allow them to freeze. Frozen, cooked chickpeas will keep well for 1 year. However, some resources state that they should be used within 6 months for best quality.

Quick Tips and Ideas for Using Chickpeas
* Make an easy hummus by blending chickpeas with olive oil, fresh garlic, tahini and lemon juice.

* Add a nutritional punch to your salads by topping them with some chickpeas.

* Make an easy pasta dish by topping cooked pasta with chickpeas, olive oil, crumbled feta cheese and fresh oregano.

* Add some chickpeas to vegetable soup to enhance its flavor, texture and nutritional value.

* Add chickpeas to a roasted veggie and quinoa salad.

* Add chickpeas to your favorite stir-fry.

Herbs/Spices That Go Well With Chickpeas
Basil (and Thai basil), bay leaf, capers, cardamom, cayenne, cilantro, cinnamon, cloves, coriander, cumin, curry powder and spices, dill, garlic, ginger, mint, mustard seeds, oregano, paprika, parsley, pepper (black and white), rosemary, saffron, sage, salt, sumac, tarragon, thyme, turmeric

Foods That Go Well with Chickpeas
Proteins, Nuts, Seeds: Almonds, beef, cashews, chicken, lentils, pine nuts, pistachios, seeds (i.e. pumpkin, sesame), tahini, walnuts

Vegetables: Artichokes, bell peppers, cabbage, carrots, cauliflower, celery, chard (Swiss), chiles, cucumbers, eggplant, fennel, green beans, greens (bitter, like beet greens), greens (salad), kale, mushrooms, onions, potatoes, scallions, spinach, squash (summer), sweet potatoes, tomatoes, zucchini

Fruits: Apples, apple cider, apple juice, apricots (dried), avocados, citrus (lemon, lime, orange), coconut, currants, mangoes, olives, pumpkin, tamarind

Grains and Grain Products: Bread, bulgur, corn, couscous, farro, millet, pasta, polenta, quinoa, rice, tortillas, wheat berries

Dairy and Non-Dairy: Buttermilk, cheese (cheddar, feta, goat, Parmesan), coconut milk, yogurt

Other Foods: Mayonnaise, oil, soy sauce, tamari, vinegar

Chickpeas have been used in the following cuisines and foods:
North African cuisine, chana masala, chili (vegetarian), curries, dips, falafels, Greek cuisine, hummus, Indian cuisine, Italian cuisine, Mediterranean cuisines, Mexican cuisine, Middle Eastern cuisines, Moroccan cuisine, salad dressings, salads, soups (i.e. minestrone, tomato, vegetable), spreads, stews, tabbouleh, veggie burgers

Suggested Flavor Combos Using Chickpeas
Combine chickpeas with the following combos…
Apricots + pistachios + tahini
Basil + brown rice + curry
Basil + cucumbers + feta cheese + garlic + red onions
Bulgur + eggplant + mint + quinoa
Cayenne + feta cheese + garlic + spinach + tomatoes
Chiles + cilantro + lime
Coriander + cumin + mint + sesame seeds
Cumin + eggplant
Garlic + lemon + tahini
Mint + onions + yogurt
Potatoes + saffron + Thai basil
Spinach + sweet potatoes

Recipe Links
Garlic Dip http://www.whfoods.com/genpage.php?tname=recipe&dbid=223

Minted Garbanzo Bean Salad http://www.whfoods.com/genpage.php?tname=recipe&dbid=191

Healthy Veggie Salad http://www.whfoods.com/genpage.php?tname=recipe&dbid=311

Curried Mustard Greens and Garbanzo Beans with Sweet Potatoes http://www.whfoods.com/genpage.php?tname=recipe&dbid=41

Chickpea Soup https://www.thespruceeats.com/revithosoupa-chickpea-soup-1706136

Carrot Hummus https://www.thespruceeats.com/carrot-hummus-4772801

Honey Roasted Chickpea Butter https://www.thekitchn.com/recipe-honey-roasted-chickpea-butter-239671

How to Make Crispy Roasted Chickpeas in the Oven https://www.thekitchn.com/how-to-make-crispy-roasted-chickpeas-in-the-oven-cooking-lessons-from-the-kitchn-219753

Risotto with Caramelized Onions, Mushrooms, and Chickpeas https://fakeginger.com/risotto-with-caramelized-onions-mushrooms-and-chickpeas/

Crispy Roasted Chickpeas https://steamykitchen.com/10725-crispy-roasted-chickpeas-garbanzo-beans.html

Coconut Ginger Chickpea Soup https://www.bonappetit.com/recipe/coconut-ginger-chickpea-soup

Spiced Chickpeas and Greens Frittata https://www.bonappetit.com/recipe/spiced-chickpeas-and-greens-frittata

Shaved Brussels Sprouts Salad with Cauliflower Steaks and Crispy Chickpeas https://producemadesimple.ca/5-ingredient-recipe-shaved-brussels-sprouts-salad-with-cauliflower-steaks-and-crispy-chickpeas/

Mediterranean Avocado Chickpea Pasta Salad with Lemon Basil Vinaigrette https://www.ambitiouskitchen.com/mediterranean-avocado-chickpea-pasta-salad/

Chickpea Flour Chocolate Chip Cookies https://www.ambitiouskitchen.com/chickpea-flour-chocolate-chip-cookies/

20 Amazing Things You Can Do With Aquafaba https://www.vegansociety.com/whats-new/blog/20-amazing-things-you-can-do-aquafaba

19 Aquafaba Recipes That Prove Chickpea Water is Not as Gross as It Sounds https://greatist.com/eat/aquafaba-recipes

The 25 Best Vegan Aquafaba Recipes You Never Knew Could Be Vegan https://www.veganfoodandliving.com/the-25-best-vegan-aquafaba-recipes-you-never-knew-could-be-vegan/

Resources
https://bienasnacks.com/blogs/biena-blog/chickpeas-information-faqs

http://www.whfoods.com/genpage.php?tname=foodspice&dbid=58

https://www.liveeatlearn.com/chickpeas/

https://www.thespruceeats.com/using-dried-chickpeas-in-moroccan-cooking-2394969

https://www.americastestkitchen.com/guides/vegan/what-is-aquafaba

https://www.bobsredmill.com/blog/featured-articles/a-guide-to-aquafaba/

Page, Karen. (2014) The Vegetarian Flavor Bible. New York, NY: Little, Brown and Company.

About Judi
Julia W. Klee (Judi) began her journey enjoying “all things food” in elementary school when she started preparing meals for her family. That love of food blossomed into a quest to learn more and more about health and wellness as related to nutrition. She went on to earn a BS Degree in Food and Nutrition, then an MS Degree in Nutrition. She has taught nutrition and related courses at the college level to pre-nursing and exercise science students. Her hunger to learn didn’t stop upon graduation from college. She continues to research on a regular basis about nutrition as it relates to health. Her hope is to help as many people as possible to enjoy foods that promote health and wellness.

Pasta with Zucchini, Mushrooms, and Tomato Sauce

Pasta with Zucchini, Mushrooms and Tomato Sauce

Here is a delicious pasta recipe that includes a flavorful combo of zucchini and mushrooms cooked with herbs and aromatics, all topped with your favorite tomato sauce and cheese, if desired. It can be made into a meatless meal or served with meat of your choice. A video demonstration is below. The written recipe is below the video.

Enjoy!
Judi

Pasta with Zucchini, Mushrooms and Tomato Sauce
Makes About 6 servings

1 lb pasta of choice
1-2 Tbsp extra virgin olive oil
About ¾ cup chopped onion
3 large cloves garlic, chopped
1/3 cup chopped bell pepper
2 medium zucchini, chopped small
1 (8 oz) pkg mushrooms of choice, sliced small
1 (15 oz) can white beans (or beans of choice), rinsed and drained, optional*
1-1/2 Tbsp dried parsley flakes
1 Tbsp dried basil
1 tsp dried oregano
Salt and pepper to taste
1/3 cup water
Juice of 1 large lemon
Tomato sauce of your choice
Parmesan or grated mozzarella cheese, optional topping

Place tomato sauce in a small pot with lid, and warm it over medium-low heat. Bring a large pot of water to boil and cook the pasta according to package directions.

Prepare the vegetables: In a large pot, briefly heat the olive oil. Sauté the onion and bell pepper for 1 to 2 minutes; add garlic and sauté for 1 minute. Add the zucchini, mushrooms, beans, spices and water; stir to combine. Cover and allow the vegetables to cook until the zucchini starts to soften, stirring occasionally. This may take from 5 to 9 minutes, depending upon how cooked you want them to be. Remove from heat and add the lemon juice; stir to combine.

When the pasta is cooked and drained, and the vegetables are cooked, your dish is ready to serve. Place some pasta on the plate and top with some vegetables. Top with some tomato sauce, and sprinkle with cheese, if desired.

* The added beans are optional, but make a nice addition for a meatless meal. If meat is preferred, omit the beans and serve this dish with the meat of your choice. A piece of chicken would go well. Also, if you want to add ground beef or sausage, browned and drained meat can be added to the tomato sauce. Ground meat can also be added to the vegetable mixture. In your large pot, brown the meat first, then drain the excess fat. You could omit the added olive oil in this case. Proceed from there with sautéing the vegetables, etc.

About Judi
Julia W. Klee (Judi) began her journey enjoying “all things food” in elementary school when she started preparing meals for her family. That love of food blossomed into a quest to learn more and more about health and wellness as related to nutrition. She went on to earn a BS Degree in Food and Nutrition, then an MS Degree in Nutrition. She has taught nutrition and related courses at the college level to pre-nursing and exercise science students. Her hunger to learn didn’t stop upon graduation from college. She continues to research on a regular basis about nutrition as it relates to health. Her hope is to help as many people as possible to enjoy foods that promote health and wellness.

Lentils with Vegetables Over Spaghetti Squash

Lentils with Vegetables Over Spaghetti Squash

If you’re wanting to give meatless meals a try once in a while, this is a good one to start with. Yes, there are a lot of ingredients, but don’t let that stop you. The lentil vegetable topping cooks in about the time it takes for the squash to roast, so there’s little time wasted in making this dish. It’s a delicious recipe of (oil-free) roasted spaghetti squash topped with a lentil and vegetable mixture. It’s delicious and makes a wholesome and light meatless meal. Below is a video demonstration with the written recipe below that.

Enjoy!
Judi

Lentils with Vegetables Over Spaghetti Squash
Makes about 4 Servings

1 medium spaghetti squash

Lentil vegetable mixture:
1 Tbsp extra virgin olive oil
1/3 cup diced onion
8 oz mushrooms, sliced
4 cloves garlic, minced
1 cup diced carrot
½ cup brown or green lentils, rinsed and drained
1-1/4 cup vegetable broth
1 (14.5 oz) can petite diced tomatoes, with juice
1 tsp dried basil
1 tsp dried thyme
½ tsp dried oregano
Pinch red pepper flakes
Salt and pepper to taste
Parmesan cheese or nutritional yeast, optional topping

Cook the spaghetti squash:
Preheat oven to 400°F. Line a baking tray with parchment paper; set aside. Wash the squash and cut it in half lengthwise. Remove the seeds, scraping them off with the tip of a spoon; discard the seeds. Place the prepared squash, cut side down, on the parchment-lined baking tray. Place on middle rack of the preheated oven. Roast about 30 minutes, or until the squash can easily be pierced with a sharp knife or a fork. Remove from oven to cool enough to be handled.

Meanwhile, prepare the lentil vegetable mixture:
In a medium-large saucepan with a lid, add the oil and briefly allow it to warm up. Add the onion and sauté it briefly until it begins to turn translucent. Add the mushrooms and garlic, stir, and sauté briefly until they just begin to cook. Add the remaining ingredients, except the squash and Parmesan cheese.

Stir the mixture and bring it to a boil. Then reduce the heat to simmer and cover the pot. Stir it occasionally, as it cooks. Adjust flavorings if needed. Simmer for about 25 to 30 minutes, until lentils are tender and most of the liquid has been absorbed.

Meanwhile, as the lentil mixture is cooking, prepare the squash:
After the squash has cooled down enough to be handled, turn the squash halves over and gently release the strands with a fork. Remove them to a serving bowl.

When everything is ready, place some squash noodles on each serving plate. Top with lentil mixture and sprinkle with Parmesan cheese or nutritional yeast, if desired. Enjoy!

Note: The lentil mixture would also be delicious served over traditional pasta, rice, quinoa, or mashed potatoes.

About Judi
Julia W. Klee (Judi) began her journey enjoying “all things food” in elementary school when she started preparing meals for her family. That love of food blossomed into a quest to learn more and more about health and wellness as related to nutrition. She went on to earn a BS Degree in Food and Nutrition, then an MS Degree in Nutrition. She has taught nutrition and related courses at the college level to pre-nursing and exercise science students. Her hunger to learn didn’t stop upon graduation from college. She continues to research on a regular basis about nutrition as it relates to health. Her hope is to help as many people as possible to enjoy foods that promote health and wellness.

Lentils

Lentils 101 – The Basics

The whole-foods, plant-based diet is increasing in popularity. So, lentils, beans, and seeds are being enjoyed by many. Even if you’re a meat eater, having a meatless meal at least once a week is encouraged. Lentils have been around for thousands of years and many people enjoy them. Yet, many others are new to lentils and just aren’t sure what to do with them. Here’s some help for you. Below is a lot of basic information about lentils, covering what they are, the various types of lentils, the nutritional and health benefits of lentils, how to flavor them and what other foods pair well with them, recipe suggestions, and more! Let me know if you need further information about lentils and I’ll do my best to help!

Enjoy!
Judi

Lentils 101 – The Basics

About Lentils
Lentils are in the legume family. They are actually pulses, which are the edible seeds that grow in pods containing only one or two seeds per pod. They are believed to have originated in central Asia, and have been eaten since prehistoric times. They are one of the first foods be cultivated. Lentil seeds dating back 8000 years have been found at archeological sites in the Middle East. Today, most lentils are grown in India, Turkey, Canada, China and Syria. There are many varieties with the most common types in American grocery stores being brown, green and red (but actually more orange in color). There are also yellow, black, and puy lentils.

The brown lentils are the variety most commonly found in American grocery stores. They have a mild, earthy flavor, and hold their shape well when cooked. Brown lentils are “universal” in the lentil family as they can be used in whatever recipe that calls for lentils. They can be mashed and used in meatless burgers, blended into soups, used in salads, and used in casseroles and literally any recipe calling for lentils. They pair well with grains.

Green lentils have a bit of a peppery flavor. This makes them particularly suitable to add to salads or any dish where a pepper flavor is welcome. They take a little longer to cook then the brown variety, but still hold their shape well while maintaining a little firmness. This type of lentil is not as commonly found in American stores as the brown lentils, and can be a little more costly.

Red lentils have a sweet, nutty flavor. They cook up faster than other varieties because they are actually split and the seed coat has been removed. This makes them soft and mushy when cooked, making them a natural thickening agent for soups, purees, and stews.

Yellow lentils are split like red lentils. They have a sweet-nutty flavor, like their red counterpart. Since they are split, they also cook up quicker than brown or green lentils, in 15 or 20 minutes. Yellow lentils are commonly used in Indian cuisine.

Black lentils are also called beluga lentils. These are the most flavorful lentils. They have a somewhat thicker skin than brown lentils, so if you want them tender, they may need to cook a little longer like the green lentils, perhaps up to 40 minutes. If you want to maintain some of their crispness, cook them for less time, about 30 minutes.

Puy (pronounced pwee) lentils come from the French region of Le Puy. They look like green lentils, but are smaller and have a peppery flavor.

Nutrition Tidbits
Lentils are an excellent source of molybdenum and folate, and a very good source of dietary fiber, copper, phosphorus and manganese. Also, they are a good source of iron, protein, Vitamin B1, pantothenic acid, zinc, potassium and Vitamin B6. Lentils contain no fat. One cup of cooked lentils provides about 1/3 of our daily protein needs (18 grams) and 230 calories.

Lentils are a good source of both soluble and insoluble fiber. The soluble fiber helps to keep our cholesterol in check (by binding with bile in the digestive tract, removing it from the body and forcing the body to use cholesterol in the system to make more bile). The insoluble fiber in lentils helps to prevent constipation while reducing the risk of irritable bowel syndrome and diverticulosis.

The fiber in lentils not only helps to regulate cholesterol levels, but also regulates blood sugar. This helps in controlling diabetes, insulin resistance and hypoglycemia. Research has confirmed that eating lentils as part of a high fiber diet helps to release energy slowly and steadily, showing dramatic effects in diabetics by controlling blood sugar and lowering cholesterol levels.

The fiber content, combined with its folate and magnesium content, works wonders in helping to lower the risk of heart disease by lowering homocysteine levels and improving blood flow around the body. Homocysteine is an important amino acid needed in certain metabolic reactions. When our folate level is low, homocysteine levels increase, causing damage to arterial walls and raising our risk for heart disease.

Lentils are also a good source of iron, with one cup of cooked lentils providing over a third of our daily needs. Iron is critical for carrying oxygen throughout the body in the bloodstream. Eating lentils on a regular basis can help keep our energy levels up and prevent iron deficiency.

How to Select Lentils
Most lentils available today are either found in bulk bins or are prepackaged. When buying lentils, make sure there is no sign of moisture or insect damage. Look for ones that are whole and not cracked.

How to Store Lentils
Store lentils in an airtight container in a dry, cool, dark place. They should keep for about a year.

How to Preserve Lentils
Once cooked, lentils will keep in the refrigerator for about one week. Cooked lentils can be frozen and should be used within three months.

How to Prepare Lentils
Compared to other beans or legumes, lentils are very easy to prepare since they need no presoaking. Before cooking them, check them for stones or debris and remove anything as needed. Place the dry lentils in a strainer and rinse them under cold water, then cook as desired.

How to Sprout Lentils
Here is my video on how to sprout lentils, from start to harvest…


How to Cook Lentils
When boiling lentils, use one part lentils to three parts water. It is not mandatory, but bringing the water to a boil first before placing the lentils in the water helps to make them more digestible. When the water returns to a boil, turn down the heat and simmer, covered, for about 30 minutes until tender. Brown lentils usually take about 30 minutes to cook. Red lentils take about 20 minutes, and black lentils may take up to 45 minutes to cook. Some recipes call for slightly more firm lentils, requiring a little less cooking time, while other recipes call for very soft lentils, requiring a little more cooking time.

Some suggested ways to use lentils:
* Try mixing lentils with rice or another grain. The combination will make a complete and very digestible protein. Vegetables can be added to make a simple meal. Suggested vegetables include dark leafy greens like kale or spinach, or crunch vegetables like carrots or bell peppers.

* Add cooked lentils to stir-fries or casseroles.

* Use pureed cooked lentils in hummus.

* Cook lentils in your favorite broth to add more flavor to them. Add some herbs to flavor them to your liking.

* Add lentils to soups and stews for a protein boost.

* Use lentils in a curry served over rice.

* Serve chili-spiced lentils with cheese and nacho chips or use them as a taco filling.

* Stuff sweet potatoes with your favorite cooked lentils. Top with cheese.

* Try a creamy red lentil soup.

* Try a lentil salad. Many can be served warm, room temperature or cold…a perfect addition to a summer gathering (or any time for that matter!).

Herbs/Spices That Go Well with Lentils
Bay leaf, cardamom, chili powder, cilantro, cinnamon, cloves, coriander, cumin, curry, garam masala, garlic, ginger, mint, oregano, paprika, parsley, rosemary, tarragon, thyme, turmeric

Other Foods That Go Well with Lentils
Meats and other proteins: Beef, eggs, fish, lamb, sausage

Grains: Rice, pasta and any just about any grains or grain product

Vegetables: Carrots, celery, leafy green vegetables, mushrooms, onion, tomatoes

Dairy: Cheese

Recipe Links
Lentils with Mushrooms and Carrots https://www.judiklee.com/2019/06/04/lentils-with-mushrooms-and-carrots/

Sweet and Savory Lentils https://www.judiklee.com/2019/05/28/sweet-and-savory-lentils/

Lentils with Vegetables over Spaghetti Squash https://youtu.be/_wrLM_1s-ZI and https://www.judiklee.com/2019/08/27/lentils-with-vegetables-over-spaghetti-squash/

Mexican Lentils and Rice https://www.lentils.org/recipe/mexican-lentils-rice/

Roasted Spring Vegetable Medley with Crispy Lentils https://www.lentils.org/recipe/roasted-spring-vegetable-medley-with-crispy-lentils/

Teriyaki Stir-fry with Lentils and Quinoa https://www.lentils.org/recipe/teriyaki-stirfry-with-lentils-quinoa/

Instant Pot Lentils Braised with Beets and Red Wine https://www.lentils.org/recipe/instant-pot-lentils-braised-with-beets-red-wine/

Shrimp with White Wine, Lentils and Tomatoes https://www.lentils.org/recipe/shrimp-with-white-wine-lentils-tomatoes/

Quick Pasta with Lentils https://www.lentils.org/recipe/quick-pasta-with-lentils/

25 Ways to Turn Lentils into Dinner https://www.thekitchn.com/25-ways-to-turn-lentils-into-dinner-248332

10 Delicious Ways to Eat Lentils https://www.onegreenplanet.org/vegan-food/delicious-ways-to-eat-lentils/

Warm Winter Greens with Balsamic Lentils and Roasted Pears https://producemadesimple.ca/warm-winter-greens-with-balsamic-lentils-and-roasted-pears/

8 Surprisingly Fast and Delicious Lentil Recipes https://www.foodandwine.com/blogs/8-surprisingly-fast-and-delicious-lentil-recipes

25 Creative Lentil Recipes That Go Way Beyond Soup https://www.bonappetit.com/recipes/slideshow/lentil-recipes

Sweet Potato and Red Lentil Curry https://www.cookinglight.com/recipes/sweet-potato-and-red-lentil-curry

15 Best Lentil Recipes https://www.acouplecooks.com/best-lentil-recipes/

Mediterranean Lentil Salad https://www.allrecipes.com/recipe/14260/mediterranean-lentil-salad/

Lentil Salad https://www.skinnytaste.com/lentil-salad/

Greek Lentil Salad https://cookieandkate.com/greek-lentil-salad-recipe/

Sexy Lentil Salad https://www.recipetineats.com/sexy-lentil-salad/

Lentil Salad https://simpleveganblog.com/lentil-salad/

Lentil and Rice Salad https://www.bonappetit.com/recipe/lentil-and-rice-salad

Quinoa Lentil Salad with Lemon Vinaigrette https://www.asweetpeachef.com/quinoa-lentil-salad-lemon-vinaigrette/

About Judi
Julia W. Klee (Judi) began her journey enjoying “all things food” in elementary school when she started preparing meals for her family. That love of food blossomed into a quest to learn more and more about health and wellness as related to nutrition. She went on to earn a BS Degree in Food and Nutrition, then an MS Degree in Nutrition. She has taught nutrition and related courses at the college level to pre-nursing and exercise science students. Her hunger to learn didn’t stop upon graduation from college. She continues to research on a regular basis about nutrition as it relates to health. Her hope is to help as many people as possible to enjoy foods that promote health and wellness.

Resources
http://www.whfoods.com/genpage.php?tname=foodspice&dbid=52#descr

https://www.lentils.org/about-lentils/

https://www.weightwatchers.com/util/art/index_art.aspx?tabnum=1&art_id=82311&sc=3022

https://www.livestrong.com/article/528308-how-to-spice-up-lentils/

https://www.simplyhealthyfamily.org/lentils-taste/

https://kitchenbyte.com/what-do-lentils-taste-like/

https://www.cookinglight.com/cooking-101/different-types-lentils

https://www.wideopeneats.com/5-different-types-of-lentils/

https://www.bonappetit.com/story/types-of-lentils

https://www.healthline.com/nutrition/lentils#types

https://www.mindbodygreen.com/0-5488/7-Health-Benefits-of-Lentils.html

https://www.thekitchn.com/flavor-combinations-beans-herb-75364

Sweet and Savory Lentils

Sweet and Savory Lentils

If you’ve never tried lentils, this is a great recipe to start with! It’s delicious, easy to make (just dump everything into the pot, stir and cook), versatile, and can be adjusted to your taste preferences (regarding “heat”). Give it a try and let me know how you like it! The recipe is below the video demonstration. Enjoy!

I hope this helps!
Judi

Sweet and Savory Lentils
Makes About 8 Servings

1-1/2 cups dried lentils, rinsed and drained
1/4 cup raisins
4 cups water (or more, if needed)
1/3 cup chopped bell pepper of choice
1 tsp garlic powder (or 4 cloves fresh garlic, minced)
Pinch dried hot red pepper flakes, or more to taste
1 Tbsp chili powder
1/2 tsp cumin powder
½ tsp dried basil
2 tsp blackstrap molasses
1 (6 oz) can tomato paste

Place all ingredients in a large saucepan. Stir to combine. Bring to a boil then lower heat to medium-low and simmer until the lentils are tender, about 30 to 45 minutes. Stir occasionally, and add more water if the mixture becomes too thick before the lentils are tender. It is helpful to lower the heat as the mixture thickens, so it won’t burn and to keep it from splashing on you as it bubbles.

Serving suggestions: This can be topped with shredded cheddar cheese and served over brown rice or used as a taco or burrito filling in place of a meat mixture. It’s also wonderful topped with cheese and served with chips. Some folks even enjoy this over cooked noodles or pasta. Enjoy!

About Judi
Julia W. Klee (Judi) began her journey enjoying “all things food” in elementary school when she started preparing meals for her family. That love of food blossomed into a quest to learn more and more about health and wellness as related to nutrition. She went on to earn a BS Degree in Food and Nutrition, then an MS Degree in Nutrition. She has taught nutrition and related courses at the college level to pre-nursing and exercise science students. Her hunger to learn didn’t stop upon graduation from college. She continues to research on a regular basis about nutrition as it relates to health. Her hope is to help as many people as possible to enjoy foods that promote health and wellness.

Quinoa with Vegetables Over Tomatoes

Here’s an easy dish that makes a lovely presentation and is refreshing on a warm day. Because quinoa is a good source of protein, it can be used as a meatless main dish or also an excellent side dish. Either way, it’s yummy! Here’s a video showing how I made this dish. Below the video is the recipe!

Happy eating!!
Judi

Quinoa with Vegetables over Tomatoes
Makes about 4 Main Dish Servings
Makes about 6 Side Servings

1 Tbsp butter
1 Tbsp extra virgin olive oil
1/4 to 1/3 cup chopped onion
1 clove garlic, minced
1 medium carrot, peeled and finely chopped
4 oz button mushrooms (about 6 each)
1 cup quinoa, rinsed and drained
1 tsp dried parsley
Salt and pepper to taste
2 cups + 2 Tbsp water
1-1/2 to 2 cups chopped fresh spinach
2-4 medium fresh tomatoes, sliced into wedges*

Optional garnishes (use one or any combination desired):
Basil, parsley cilantro, sesame seeds, juice of ½ lemon or lime

In a medium-large saucepan (with a lid), heat the butter and oil over medium heat. Add the onion and sauté briefly. Add the garlic, carrot, and mushrooms, and sauté briefly until the vegetables begin to cook. Stir in the (uncooked) quinoa, parsley, salt and pepper, and allow the quinoa to toast briefly.

Add the water and stir to combine, making sure all the quinoa is in the water. Cover the pot and turn the heat up to bring everything to a boil. Turn the timer on for 15 minutes as soon as the water comes to a boil. Then turn the heat down to medium low and allow everything to simmer until the timer goes off.

Turn the burner off; stir in the spinach. Cover the pan and remove it from the hot burner. Allow the mixture to rest for 5 minutes in the covered pan. Fluff with a fork and serve over tomato wedges that were arranged in a pinwheel design on the plate.

*Another option: Rather than serving the quinoa over tomato wedges, you could reserve one whole tomato per person and do the following: Slice off the top and remove the seeded area of the tomato. Spoon the quinoa mixture into the tomato, filling it to the top. Place the top of the tomato back in its place. Place filled tomatoes in a glass baking dish (not greased) and into a preheated 400F oven for 10 to 15 minutes, until the tomatoes JUST begin to cook. This would make a lovely side dish with many types of meals. It’s delicious!

Build a Better Salad

Build A Better Salad

We love salads…BIG salads. Whole meal salads are what I’m referring to here. These are complete meals in a bowl and not just with a little lettuce, tomato and cheese. These salads are filled with assorted vegetables, protein sources, and fruit. What’s even better is the fact that they are totally flexible in what is put in them, so they can be tailored to individual likes and dislikes as well as what’s available at the moment. These salads are better (to us) than any salad we can get in a restaurant because they’re made the way WE like them, with ingredients WE prefer! You too can build a better salad, YOUR way. The following are the basics of how I build a better salad…

Start with a lettuce bed of mixed greens. Use a mixture of assorted greens as the foundation of your salad. Use whatever you can get and mix them up…iceberg, Romaine, green and/or red leaf lettuces, arugula, baby kale, spring mix, spinach, red or green cabbage, etc. Get creative!

Add a big assortment of fresh veggies. Again, get creative. Use what you have available to you and don’t be afraid to try something new. Suggestions include: cucumber, tomatoes, yellow squash, zucchini squash, celery, red, green, and/or yellow bell pepper, fresh broccoli and/or cauliflower, lightly steamed (and cooled) asparagus, jicama, red or yellow onion, scallions, chives, minced garlic, lightly steamed (and cooled) green beans, roasted (and cooled) Brussels sprouts… Explore the produce isle of your favorite grocery store and let your imagine run wild!

Add a protein source (or two…or three). I always add thawed frozen green peas to our salads. They make a nice addition to any green salad and are packed full of protein. They’re for starters. From there, I add garbanzo beans (to my salad), diced cheese, assorted nuts of choice, and sometimes sliced hard boiled egg. If you’re a fan of meats in your salads, thinly sliced grilled steak or chicken breast would be a flavorful addition. Grilled salmon would be a prized addition, too. Whether you add meat or not, there are plenty of options to choose from so that your salad will provide enough protein to meet anyone’s needs.

Build a Better Salad

Build a Better Salad

Add fruit for color, sweetness and eye candy. We started adding fruit to our meal salads after my husband returned from a trip to Hawaii with his college jazz band. He found that restaurants there added fruit to their salads and he really enjoyed it. Thanks Hawaii! Good fruits to include are fresh or canned pineapple, chopped fresh apple, blueberries, strawberries, tangerine (Clementine) sections, grapes (seedless would be preferred). Even diced pear would make a good addition! Try fresh raspberries for added sweet/tang!

Dress your salad…but don’t overdo it. Dressings are added to salads for flavor, moisture and binding properties. The problem with dressings is that many people simply add too much. This can make salads unhealthful to eat. The veggies and fruit are not the culprits. It’s the dressing. The above salad suggestions would go well with just about any dressing you choose. Just strive to go light on the dressing and still enjoy the wonderful flavors of the vegetables, fruits, and protein foods you used to construct your meal. If you can’t taste the other components, then you have too much dressing. Make it your goal to avoid using too much dressing. This will keep your salads healthful and calorie-controlled.

We usually use oil and vinegar as our salad dressing. The ratio will vary according to individual tastes, but a general rule of thumb is 2 parts oil to 1 part vinegar. A lot of flavor variation can be obtained by using different vinegars at different times: red wine, apple cider, tarragon, raspberry, and rice vinegars all lend different flavors to a salad, so experiment. Added herbs can also bring a new flavor to your salad. Suggestions include: oregano, dill, parsley, and tarragon (used individually, not all in the same salad). Get creative!

Here’s a video showing the construction of the salads in the featured photo. Enjoy! Judi


Homemade Marinara Sauce

Homemade Marinara / Spaghetti / Tomato Sauce

My mother was a first generation American. Both of her parents were from Italy. Since I started cooking at a very early age, she taught me how to make homemade marinara / spaghetti / tomato sauce (whatever you want to call it) when I was in elementary school. Really! After all these years I had not put this recipe in a written form. I thought it was about time I did that, if for no other reason than to pass it along to my children. So, lucky you! You get to share in this recipe too!

Below is the recipe, followed by a video where I demonstrate making it. Of course, it’s very flexible with the seasonings. Feel free to adjust to your taste.

Enjoy!
Judi

Homemade Tomato / Marinara / Spaghetti Sauce
Makes About 2-1/2 Quarts
(No worries…freeze the extra in small containers)

1 Tbsp extra virgin olive oil
3 cloves garlic, minced (or 1 tsp dried garlic powder)
1/2 medium onion, chopped (or 1 to 2 Tbsp dried minced onion)
1/2 cup diced green bell pepper
1 stalk celery, diced
1 carrot, peeled, left whole or finely grated (recommended, but optional)
2 (28 oz) cans crushed or diced tomatoes
1 (12 oz) can tomato paste
1 (12 oz) can water (or more if needed)
1 tsp granulated sugar
1-1/2  to 2 tsp dried basil
1 Tbsp dried parsley
1 tsp dried oregano
1 Bay leaf
1/4 tsp black pepper
Salt to taste

Preheat a large pot over medium heat. Add olive oil and vegetables (garlic, onion, bell pepper, celery, and carrot). Stir and saute the vegetables until they start to soften. Add the remaining ingredients; stir to combine. Reduce heat to medium-low to low and cover the pot. Allow sauce to simmer gently for about 2 hours or more if you want a thicker sauce. Stir sauce occasionally as it cooks so it does not burn on the bottom. Taste after 30 minutes and adjust seasonings, if desired. Continue cooking until sauce is thick and flavors are blended well. Serve with pasta, stuffed cabbage or peppers, chicken cacciatore, Swiss steak, and use on pizza, or in any dish calling for a tomato-based sauce. Cool extra sauce and freeze in small containers, enough for one meal at a time.

Note: If you want to add ground beef or sausage to this sauce, brown the meat first in the pan you plan to cook the sauce in. Drain excess fat and proceed as directed. If a little fat is left in the pan, you can omit the olive oil.

If you want to add meat balls to the sauce, it is best to prepare the meat balls and precook them before adding them to the sauce. This avoids having excessive fat in the sauce, and the meatballs will stay together better. They can be pan-fried, baked or broiled before being added to the sauce. Add them to the sauce after combining all the sauce ingredients. Allow the meat to simmer in the sauce as it cooks. Stir gently, so as not to break up the meatballs.

When time is short, this sauce cooks well in a slow cooker. You can sauté the vegetables first, then add them to the slow cooker. Or, simply place all ingredients (omitting the oil) in the slow cooker early in the day and cook on low until supper time. You’ll have homemade sauce, ready to go!

About Judi
Julia W. Klee (Judi) began her journey enjoying “all things food” in elementary school when she started preparing meals for her family. That love of food blossomed into a quest to learn more and more about health and wellness as related to nutrition. She went on to earn a BS Degree in Food and Nutrition, then an MS Degree in Nutrition. She has taught nutrition and related courses at the college level to pre-nursing and exercise science students. Her hunger to learn didn’t stop upon graduation from college. She continues to research on a regular basis about nutrition as it relates to health. Her hope is to help as many people as possible to enjoy foods that promote health and wellness.

Meatless Stuffed Peppers

Meatless Stuffed Peppers

I love bell peppers, any way they’re fixed…raw, added to a salad, sauteed, and stuffed. Here’s a recent recipe I’ve developed that’s quickly become one of our favorites! The recipe is below and that’s followed by a video showing the making of this delicious vegetarian  dish. Enjoy! Judi

Meatless Stuffed Peppers
Makes 3 Servings

3 bell peppers, washed, tops and cores removed
1 can beans of choice, rinsed and drained
(or 1-3/4 cups cooked dried beans of choice)
1-1/2 cups cooked brown rice
1/4 to 1/3 cup diced fresh tomato
1/4 to 1/2 cup chopped vegetable of choice
(ie fresh or frozen kale, spinach, zucchini, yellow squash), optional
2-3 tsp dried minced onion*
1/2 to 3/4 tsp garlic powder*
1/2 to 3/4 tsp dried basil leaves
1 to 1-1/2 tsp dried parsley flakes
1/4 to 3/8 tsp dried oregano
Salt and pepper to taste
Tomato sauce of choice
Grated Parmesan cheese (optional)

Prepare bell peppers and place them in a deep casserole dish that has a lid; set aside. In a food processor, coarsely process 2/3 to 3/4 of the cooked beans, leaving the remaining beans whole; set aside.

In a large bowl, add the prepared beans, cooked rice, diced tomato and other vegetable of choice, the herbs, and salt and pepper. Add grated Parmesan cheese, if desired. Stir to combine. Spoon in tomato sauce until ingredients bind together, using about 1/4 to 1/3 cup of the tomato sauce.

Spoon filling into prepared bell peppers. Place another tablespoon or two of tomato sauce on top of the peppers and place about 1/3 cup of the sauce around the peppers in the bottom of the casserole dish. Place lid on casserole.

Bake at 350°F for 45 to 50 minutes, until peppers are tender and filling is very hot. Remove from oven and put the peppers onto serving plates. Spoon sauce from the bottom of the casserole onto peppers as a garnish. Serve with grated Parmesan cheese, if desired.

*If preferred, fresh onion and garlic may be used. Use 2 or 3 large cloves garlic, minced, and about 1/4 to 1/3 cup finely chopped onion. Saute briefly in 1 tablespoon extra virgin olive oil until barely tender. Add to mixture as per instructions above.